Add Disks in Node-1 for ASM, Make it shareable Disk & Add in Node-2(Step By Step)
++++++++++++++++++++++++++++++++++++++++++++++++++++++++++++
Step 1: Make Sure your both Server should be shutdown then Select your machine "11g_node01" and click on "Setting" option to add addition disks for ASM Disk.


Step 3: "VirtualBox - Question" dialog box will popup, Click on "Create New Disk".

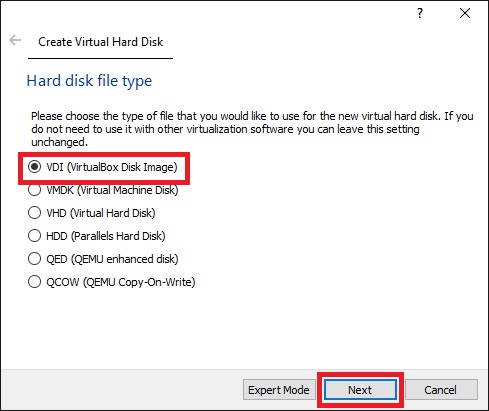
Step 4: Same popup window will show different option "Hard disk file type" choose "VDI (Virtualbox disk Image)" option and click on "Next".

Step 5: Same popup window will show different option "Storage on physical hard disk" choose "Fixed Size" option and click on "Next".

Step 6: Same popup window will show different option "File location and size" click on "folder icon".

Step 8: Select directory "11g_Shared" to save disks for ASM.

Step 9: In my case I have saved in "11g_shared" directory as the name of "ASM_11g_RAC_disk01".

Step 10: I have took "06.00 GB" for one disk and click on "Create"

Step 11: Fixed disk creation in-progress for ASM.

Step 12: Like Step 2 to Step 11 you have to create more disks for FRA, OCR & Voting disk. I have created total "6 disk" as below showed in Storage option. My disks name are "ASM_11g_RAC_disk01 (6 GB)", "ASM_11g_RAC_disk02 (6 GB) ", "ASM_11g_RAC_FRA01 (12 GB)", "ASM_11g_RAC_vote_OCR01 (2 GB)", "ASM_11g_RAC_vote_OCR02 (2 GB) ", "ASM_11g_RAC_vote_OCR03 (2 GB)".

Step 12: Now make all created disk Shareable so Click on "File" of VirtualBox and select "Virtual Media Manager"

Step 13: Now Select 1 by 1 all disk which you have created and click on "Modify"

Step 13: Now one dialog box will open "Modify Medium Attributes", click on "Shareable" and click on "OK", Do for all the disk 1 by 1 whatever disk you want to make shareable.

Step 14: Now try to attach these disks in node-2, so select node "11g_node02" and click on "Settings".


Step 16: "VirtualBox - Question" dialog box will popup, This time you have to Click on "Choose existing disk".

Step 17: Add 1 by 1 all existing disks in node-2 which you have created for ASM, Voting and OCR disks.

Step 18: Now you can see in below image I have added all disks in node-2.

If you want to Configure VirtualBox Version 5.0.20 Machine for 2 Node RAC & Install Linux 6.4 on both node follow the below link.
Step 1: Make Sure your both Server should be shutdown then Select your machine "11g_node01" and click on "Setting" option to add addition disks for ASM Disk.
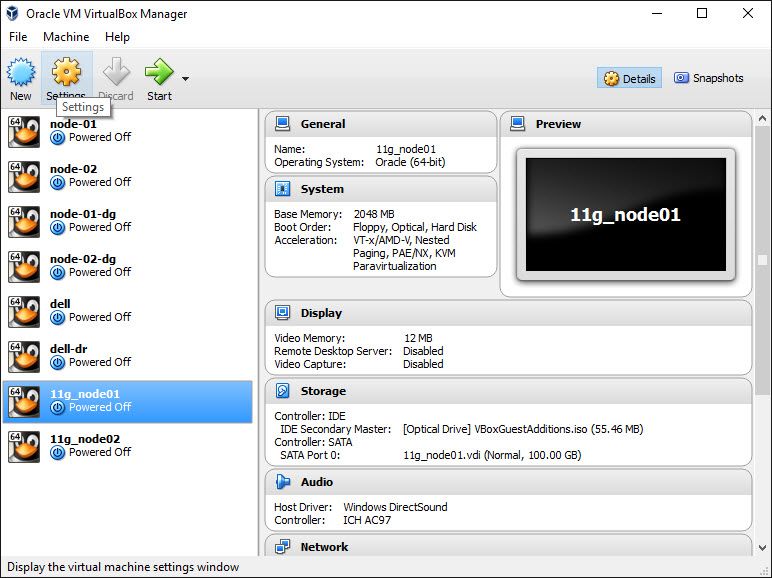
Step 2: Setting dialog box will popup, Select "Storage" option and In General choose "Controller:SATA" option, and click on + sing at right side.

Step 3: "VirtualBox - Question" dialog box will popup, Click on "Create New Disk".

Step 4: Same popup window will show different option "Hard disk file type" choose "VDI (Virtualbox disk Image)" option and click on "Next".

Step 5: Same popup window will show different option "Storage on physical hard disk" choose "Fixed Size" option and click on "Next".

Step 6: Same popup window will show different option "File location and size" click on "folder icon".

Step 8: Select directory "11g_Shared" to save disks for ASM.

Step 9: In my case I have saved in "11g_shared" directory as the name of "ASM_11g_RAC_disk01".

Step 10: I have took "06.00 GB" for one disk and click on "Create"

Step 11: Fixed disk creation in-progress for ASM.

Step 12: Like Step 2 to Step 11 you have to create more disks for FRA, OCR & Voting disk. I have created total "6 disk" as below showed in Storage option. My disks name are "ASM_11g_RAC_disk01 (6 GB)", "ASM_11g_RAC_disk02 (6 GB) ", "ASM_11g_RAC_FRA01 (12 GB)", "ASM_11g_RAC_vote_OCR01 (2 GB)", "ASM_11g_RAC_vote_OCR02 (2 GB) ", "ASM_11g_RAC_vote_OCR03 (2 GB)".

Step 12: Now make all created disk Shareable so Click on "File" of VirtualBox and select "Virtual Media Manager"

Step 13: Now Select 1 by 1 all disk which you have created and click on "Modify"

Step 13: Now one dialog box will open "Modify Medium Attributes", click on "Shareable" and click on "OK", Do for all the disk 1 by 1 whatever disk you want to make shareable.

Step 14: Now try to attach these disks in node-2, so select node "11g_node02" and click on "Settings".

Step 15: Setting dialog
box will popup, Select "Storage" option and In
General choose "Controller:SATA" option, and
click on + sing at right side.

Step 16: "VirtualBox - Question" dialog box will popup, This time you have to Click on "Choose existing disk".

Step 17: Add 1 by 1 all existing disks in node-2 which you have created for ASM, Voting and OCR disks.

Step 18: Now you can see in below image I have added all disks in node-2.

Happy Sharing and Learning :)
Pradeep Kumar : )
+919972201100